入门指南 欢迎来到 Socket.IO 教程!
在本教程中,我们将创建一个基本的聊天应用程序。几乎不需要 Node.JS 或 Socket.IO 的基础知识,因此适合各种知识水平的用户。
介绍 使用流行的 Web 应用程序堆栈(如 LAMP(PHP))编写聊天应用程序通常非常困难。它涉及轮询服务器以获取更改、跟踪时间戳,并且速度比应有的要慢得多。
传统上,套接字是大多数实时聊天系统架构的解决方案,提供了客户端和服务器之间的双向通信通道。
这意味着服务器可以向客户端推送消息。每当你编写一个聊天消息时,服务器会收到它并将其推送给所有其他连接的客户端。
如何使用本教程 工具 任何文本编辑器(从基本的文本编辑器到完整的 IDE,如 VS Code ) 都应足以完成本教程。
语法设置 在 Node.js 世界中,有两种导入模块的方式:
标准方式:ECMAScript 模块(或 ESM)
1 import { Server } from "socket.io" ;
参考链接: https://nodejs.org/api/esm.html
1 const { Server } = require ("socket.io" );
参考链接: https://nodejs.org/api/modules.html
Socket.IO 支持这两种语法。
我们建议在您的项目中使用 ESM 语法,尽管由于一些包不支持这种语法,这可能并不总是可行。
为了方便起见,在整个教程中,每个代码块都允许您选择您喜欢的语法:
1 import { Server } from "socket.io" ;
项目初始化 第一个目标是建立一个简单的 HTML 网页,用于提供一个表单和一列消息。我们将使用 Node.JS 的 web 框架 express 来实现这一目标。确保已安装 Node.JS 。
首先让我们创建一个描述我们项目的 package.json 清单文件。我建议你将它放在一个专门的空目录中(我将称之为 socket-chat-example)。
1
2
3
4
5
6
7
{ "name" : "socket-chat-example" , "version" : "0.0.1" , "description" : "my first socket.io app" , "type" : "module" , "dependencies" : {} }
“name” 属性必须是唯一的,你不能使用像 “socket.io” 或 “express” 这样的值,因为在安装依赖时 npm 会报错。
现在,为了方便地填充 dependencies 属性,我们将使用 npm install:
安装完成后,我们可以创建一个 index.js 文件来设置我们的应用程序。
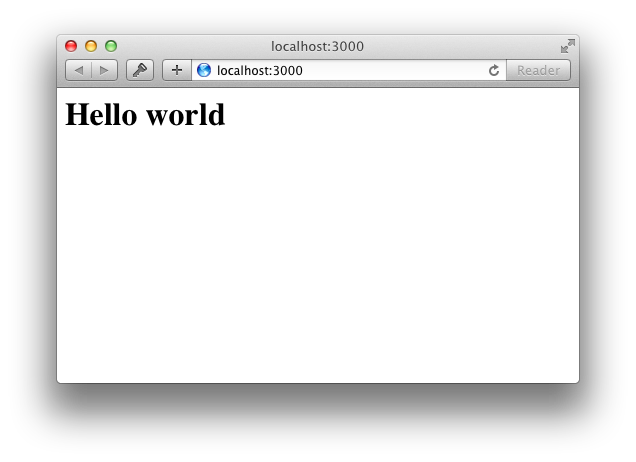
1
2
3
4
5
6
7
8
9
10
11
12
13
import express from 'express' ;import { createServer } from 'node:http' ;const app = express();const server = createServer(app);app.get('/' , (req, res) => { res.send('<h1>Hello world</h1>' ); }); server.listen(3000 , () => { console .log('server running at http://localhost:3000' ); });
这意味着:
Express 初始化 app 为一个函数处理器,你可以提供给一个 HTTP 服务器(如第 5 行所示)。
我们定义了一个路由处理器 /,当我们访问我们的网站首页时会被调用。
我们让 HTTP 服务器监听在 3000 端口上。
如果你运行 node index.js,你应该会看到如下内容:
如果你将浏览器指向 http://localhost:3000:
到目前为止,一切顺利!
提供 HTML 页面 到目前为止,在 index.js 中,我们调用了 res.send 并传递了一个 HTML 字符串。如果我们将整个应用程序的 HTML 放在那里,我们的代码会显得非常混乱,因此我们将创建一个 index.html 文件并将其提供出来。
让我们重构我们的路由处理器,改用 sendFile .
1
2
3
4
5
6
7
8
9
10
11
12
13
14
15
16
17
import express from 'express' ;import { createServer } from 'node:http' ;import { fileURLToPath } from 'node:url' ;import { dirname, join } from 'node:path' ;const app = express();const server = createServer(app);const __dirname = dirname(fileURLToPath(import .meta.url));app.get('/' , (req, res) => { res.sendFile(join(__dirname, 'index.html' )); }); server.listen(3000 , () => { console .log('server running at http://localhost:3000' ); });
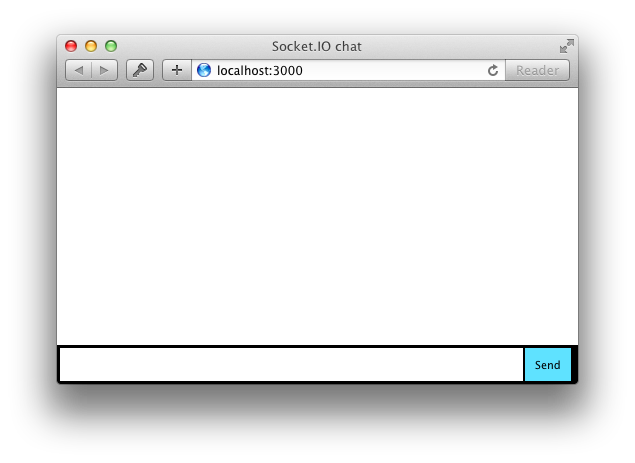
在你的 index.html 文件中放入以下内容:
1
2
3
4
5
6
7
8
9
10
11
12
13
14
15
16
17
18
19
20
21
22
23
24
25
<!DOCTYPE html > <html > <head > <meta name ="viewport" content ="width=device-width,initial-scale=1.0" > <title > Socket.IO chat</title > <style > body { margin : 0 ; padding-bottom : 3rem ; font-family : -apple-system, BlinkMacSystemFont, "Segoe UI" , Roboto, Helvetica, Arial, sans-serif; } #form { background : rgba (0 , 0 , 0 , 0.15 ); padding : 0.25rem ; position : fixed; bottom : 0 ; left : 0 ; right : 0 ; display : flex; height : 3rem ; box-sizing : border-box; backdrop-filter : blur (10px ); } #input { border : none; padding : 0 1rem ; flex-grow : 1 ; border-radius : 2rem ; margin : 0.25rem ; } #input :focus { outline : none; } #form > button { background : #333 ; border : none; padding : 0 1rem ; margin : 0.25rem ; border-radius : 3px ; outline : none; color : #fff ; } #messages { list-style-type : none; margin : 0 ; padding : 0 ; } #messages > li { padding : 0.5rem 1rem ; } #messages > li :nth-child(odd) { background : #efefef ; } </style > </head > <body > <ul id ="messages" > </ul > <form id ="form" action ="" > <input id ="input" autocomplete ="off" /> <button > Send</button > </form > </body > </html >
如果你重新启动进程(通过按 Control+C 然后再次运行 node index.js ),然后刷新页面,应该会看到如下内容:
你可以直接在以下网址中在浏览器中运行此示例:
集成 Socket.IO Socket.IO 由两部分组成:
在开发过程中, socket.io 会自动为我们提供客户端服务,我们将会看到,因此现在我们只需要安装一个模块:
这将安装模块并将其添加到 package.json的依赖项中。现在让我们编辑 index.js 来添加它:
1
2
3
4
5
6
7
8
9
10
11
12
13
14
15
16
17
18
19
20
21
22
23
import express from 'express' ;import { createServer } from 'node:http' ;import { fileURLToPath } from 'node:url' ;import { dirname, join } from 'node:path' ;import { Server } from 'socket.io' ;const app = express();const server = createServer(app);const io = new Server(server);const __dirname = dirname(fileURLToPath(import .meta.url));app.get('/' , (req, res) => { res.sendFile(join(__dirname, 'index.html' )); }); io.on('connection' , (socket) => { console .log('a user connected' ); }); server.listen(3000 , () => { console .log('server running at http://localhost:3000' ); });
注意,我通过传递server (HTTP 服务器) 对象来初始化一个新的 socket.io 实例。 然后我监听 connection 事件以获取传入的 socket 并将其记录到控制台中。
现在在index.html 中在 </body> (结束 body 标签)之前添加以下代码片段:
1 2 3 4 <script src ="/socket.io/socket.io.js" > </script > <script > const socket = io(); </script >
这就是加载 socket.io-client所需的全部内容,它会暴露一个全局的 io (和端点 GET /socket.io/socket.io.js), 然后连接。
如果你想使用本地版本的客户端 JS 文件, 你可以在 node_modules/socket.io/client-dist/socket.io.js找到它。
你也可以使用 CDN 而不是本地文件 (例如 <script src="https://cdn.socket.io/4.7.4/socket.io.min.js"></script>).
请注意,当我调用 io()时, 我没有指定任何 URL,因为它默认尝试连接到提供页面的主机。
如果你在反向代理(如 apache 或 nginx)后面,请查看 相关文档 .
如果你的应用托管在不是你的网站的根目录下 (e.g., https://example.com/chatapp) 则还需要在服务器和客户端中指定 路径 。
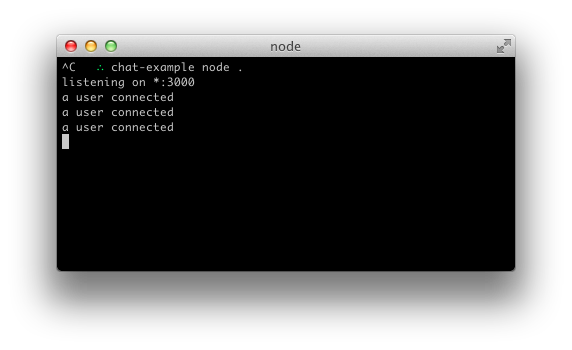
如果现在重新启动进程(通过按 Control+C 然后再次运行 node index.js ),然后刷新网页,你应该会在控制台中看到打印出“a user connected”。
尝试打开几个选项卡,你会看到几条消息。
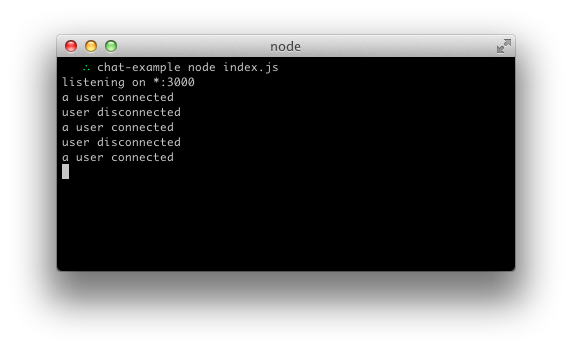
每个 socket 也会触发一个特殊的 disconnect 事件:
1 2 3 4 5 6 io.on('connection' , (socket) => { console .log('a user connected' ); socket.on('disconnect' , () => { console .log('user disconnected' ); }); });
然后如果你刷新一个选项卡几次,你就可以看到它的作用。
你可以直接在以下网址中在浏览器中运行此示例:
发送事件 Socket.IO 的主要思想是你可以发送和接收任何你想要的事件,带有任何你想要的数据。任何可以编码为 JSON 的对象都可以,而且也支持 二进制数据 .
让我们使用户在输入消息时,服务器接收到它作为一个 chat message 事件。 script 中的 index.html 部分现在应该如下所示:
1 2 3 4 5 6 7 8 9 10 11 12 13 14 15 <script src ="/socket.io/socket.io.js" > </script > <script > var socket = io(); var form = document .getElementById('form' ); var input = document .getElementById('input' ); form.addEventListener('submit' , function (e ) e.preventDefault(); if (input.value) { socket.emit('chat message' , input.value); input.value = '' ; } }); </script >
在 index.js 中, 我们打印出 chat message 事件:
1 2 3 4 5 io.on('connection' , (socket) => { socket.on('chat message' , (msg) => { console .log('message: ' + msg); }); });
结果应该如下视频所示:
你可以直接在以下网址中在浏览器中运行此示例:
广播 下一个目标是我们从服务器向其他用户发送事件。
为了向所有人发送事件,Socket.IO 给了我们 io.emit() 方法.
1 2 io.emit('hello' , 'world' );
如果你想要向除了某个特定发射套接字之外的所有人发送消息,我们有 broadcast 标志来从该套接字发出:
1 2 3 io.on('connection' , (socket) => { socket.broadcast.emit('hi' ); });
在这种情况下,为了简单起见,我们将消息发送给所有人,包括发送者。
1 2 3 4 5 io.on('connection' , (socket) => { socket.on('chat message' , (msg) => { io.emit('chat message' , msg); }); });
在客户端,当我们捕获到 chat message 事件时,我们将其包含在页面中。
1 2 3 4 5 6 7 8 9 10 11 12 13 14 15 16 17 18 19 20 21 22 23 <script src ="/socket.io/socket.io.js" > </script > <script > var socket = io(); var form = document .getElementById('form' ); var input = document .getElementById('input' ); var messages = document .getElementById('messages' ); form.addEventListener('submit' , function (e ) e.preventDefault(); if (input.value) { socket.emit('chat message' , input.value); input.value = '' ; } }); socket.on('chat message' , function (msg ) var item = document .createElement('li' ); item.textContent = msg; messages.appendChild(item); window .scrollTo(0 , document .body.scrollHeight); }); </script >
让我们看看它的效果:
你可以直接在以下网址中在浏览器中运行此示例:
API 概览 在我们进一步深入之前,让我们快速浏览一下 Socket.IO 提供的 API:
公共 API 以下方法适用于客户端和服务器端。
基本的 emit 正如我们在上边看到的, 你可以使用 socket.emit()将任何数据发送给另一侧:
Server
1 2 3 io.on('connection' , (socket) => { socket.emit('hello' , 'world' ); });
Client
1 2 3 socket.on('hello' , (arg) => { console .log(arg); });
你可以发送任意数量的参数,支持所有可序列化的数据结构,包括二进制对象,如 ArrayBuffer , TypedArray 或 Buffer (仅限 Node.js):
Server
1 2 3 io.on('connection' , (socket) => { socket.emit('hello' , 1 , '2' , { 3 : '4' , 5 : Buffer.from([6 ]) }); });
Client
1 2 3 4 5 socket.on('hello' , (arg1, arg2, arg3) => { console .log(arg1); console .log(arg2); console .log(arg3); });
不需要调用 JSON.stringify() 来处理对象:
1 2 3 4 5 socket.emit('hello' , JSON .stringify({ name : 'John' })); socket.emit('hello' , { name : 'John' });
应答 事件很好,但在某些情况下,你可能想要一个更经典的请求-响应 API。在 Socket.IO 中,这个功能被命名为“应答”。
它有两种方式:
使用回调函数 你可以在 emit()的最后一个参数中添加一个回调函数, 这个回调函数会在另一侧确认事件后被调用:
1 2 3 4 5 6 7 8 9 io.on('connection' , (socket) => { socket.timeout(5000 ).emit('request' , { foo : 'bar' }, 'baz' , (err, response) => { if (err) { } else { console .log(response.status); } }); });
Client
1 2 3 4 5 6 7 socket.on('request' , (arg1, arg2, callback) => { console .log(arg1); console .log(arg2); callback({ status: 'ok' }); });
使用 Promise emitWithAck() 方法提供了相同的功能, 但返回一个 Promise, 该 Promise 在另一侧确认事件后解析:
Server
1 2 3 4 5 6 7 8 io.on('connection' , async (socket) => { try { const response = await socket.timeout(5000 ).emitWithAck('request' , { foo : 'bar' }, 'baz' ); console .log(response.status); } catch (e) { } });
Client
1 2 3 4 5 6 7 socket.on('request' , (arg1, arg2, callback) => { console .log(arg1); console .log(arg2); callback({ status: 'ok' }); });
注意
不支持 Promise 的环境 (如 Internet Explorer) 需要添加一个 polyfill 或使用像 babel 这样的编译器来使用此功能(但这超出了本教程的范围)。
捕获所有监听器 捕获所有监听器是指一个监听器,它将被调用以处理任何传入事件。这对于调试你的应用程序很有用:
Sender
1 socket.emit('hello' , 1 , '2' , { 3 : '4' , 5 : Uint8Array .from([6 ]) });
Receiver
1 2 3 4 socket.onAny((eventName, ...args ) => { console .log(eventName); console .log(args); });
同样地,对于发送的数据包:
1 2 3 4 socket.onAnyOutgoing((eventName, ...args ) => { console .log(eventName); console .log(args); });
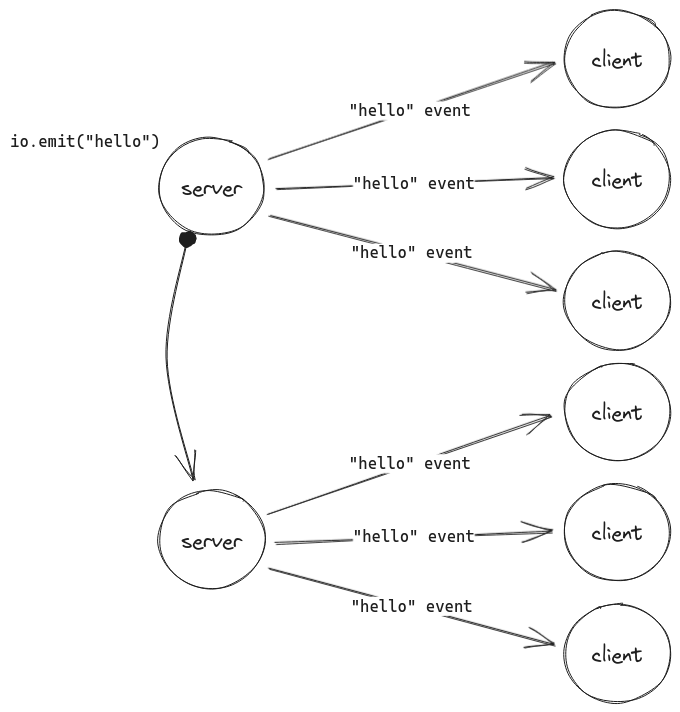
服务器端 API 广播 正如我们在前面的介绍中, 你可以使用 io.emit() 将事件广播给所有连接的客户端:
1 io.emit('hello' , 'world' );
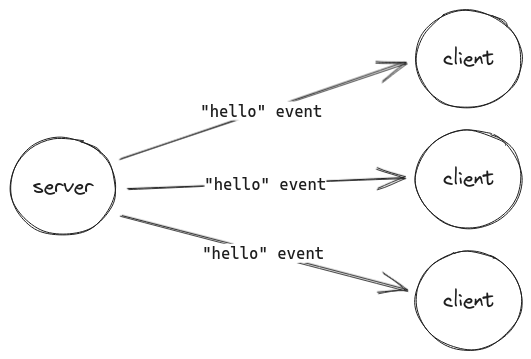
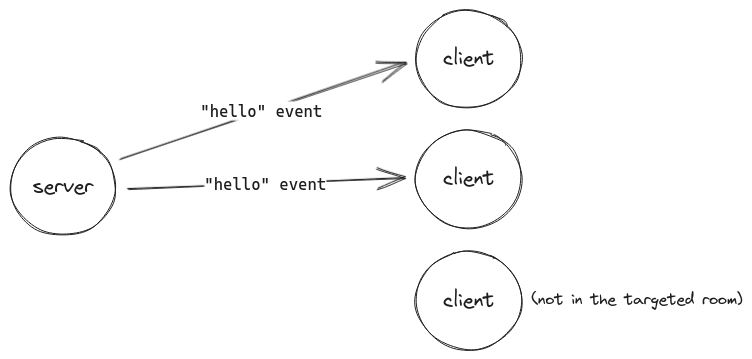
房间 在 Socket.IO 术语中,房间 是一个任意的频道,套接字可以加入和离开。它可用于向一组连接的客户端广播事件:
1 2 3 4 5 6 7 8 9 10 11 12 13 io.on('connection' , (socket) => { socket.join('some room' ); io.to('some room' ).emit('hello' , 'world' ); io.except('some room' ).emit('hello' , 'world' ); socket.leave('some room' ); });
处理断开连接 现在,让我们强调 Socket.IO 的两个非常重要的特性:
Socket.IO 客户端并非始终连接着
Socket.IO 服务器不会存储任何事件
即使在稳定的网络下,也无法永远保持连接活跃。
这意味着你的应用程序需要能够在临时断开连接后将客户端的本地状态与服务器上的全局状态同步。
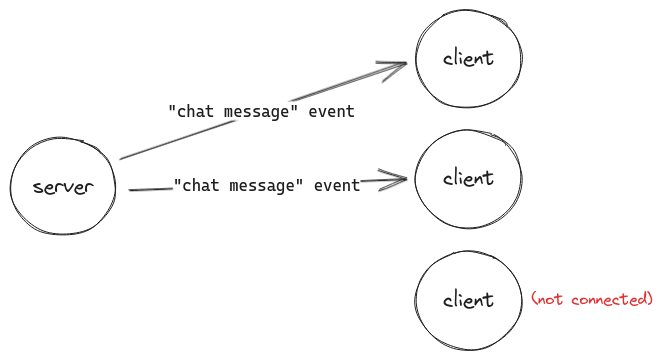
Socket.IO 客户端会在一小段延迟后自动尝试重新连接。然而,在断开连接期间任何错过的事件将会对该客户端彻底丢失。
在我们的聊天应用程序的情境中,这意味着断开连接的客户端可能会错过一些消息:
我们将在接下来的步骤中看到如何改进这一点。
连接状态恢复 首先,让我们通过假装没有断开连接来处理断开连接:这个功能称为“连接状态恢复”。
这个功能将临时 存储服务器发送的所有事件,并在客户端重新连接时尝试恢复客户端的状态:
它必须在服务器端启用:
title 1 2 3 const io = new Server(server, { connectionStateRecovery: {} });
让我们看看它的实际效果:
正如你在上面的视频中看到的那样,在重新建立连接时,“realtime”消息最终被传递。
“Disconnect” 按钮是为了演示目的而添加的。
1 2 3 4 5 6 7 8 9 10 11 12 13 14 15 16 17 18 19 20 21 <form id ="form" action ="" > <input id ="input" autocomplete ="off" /> <button > Send</button > // highlight-start <button id ="toggle-btn" > Disconnect</button > // highlight-end </form > <script > const toggleButton = document .getElementById('toggle-btn' ); toggleButton.addEventListener('click' , (e) => { e.preventDefault(); if (socket.connected) { toggleButton.innerText = 'Connect' ; socket.disconnect(); } else { toggleButton.innerText = 'Disconnect' ; socket.connect(); } }); </script >
太好了!现在,你可能会问:
但这是一个很棒的功能,为什么默认没有启用呢?
有几个原因:
它并不总是有效,例如,如果服务器突然崩溃或重新启动,则客户端状态可能无法保存
在扩展时,不总是能够启用此功能
话虽如此,这确实是一个很棒的功能,因为在临时断开连接后,你不必同步客户端的状态(例如,当用户从 WiFi 切换到 4G 时)。
在下一步中,我们将探讨一个更通用的解决方案。
你可以直接在浏览器中运行这个示例:
服务器端消息传递 在重新连接时,有两种常见的方式来同步客户端的状态:
要么服务器发送整个状态
要么客户端跟踪它已处理的最后一个事件,服务器发送丢失的部分
这两种方法都是完全有效的解决方案,选择其中一种将取决于您的使用情况。在本教程中,我们将选择后者。
首先,让我们持久化我们聊天应用程序的消息。今天有许多出色的选择,我们将在这里使用 SQLite 。
如果您不熟悉 SQLite,可以在网上找到许多教程,比如 这个 .
让我们安装必要的包:
1 npm install sqlite sqlite3
我们将简单地将每条消息存储在一个 SQL 表中:
title 1 2 3 4 5 6 7 8 9 10 11 12 13 14 15 16 17 18 19 20 21 22 23 24 25 26 27 28 29 30 31 32 33 34 35 36 37 38 39 40 41 42 43 44 45 46 47 48 49 50 51 52 53 import express from 'express' ;import { createServer } from 'node:http' ;import { fileURLToPath } from 'node:url' ;import { dirname, join } from 'node:path' ;import { Server } from 'socket.io' ;import sqlite3 from 'sqlite3' ;import { open } from 'sqlite' ;const db = await open({ filename: 'chat.db' , driver: sqlite3.Database }); await db.exec(` CREATE TABLE IF NOT EXISTS messages ( id INTEGER PRIMARY KEY AUTOINCREMENT, client_offset TEXT UNIQUE, content TEXT ); ` );const app = express();const server = createServer(app);const io = new Server(server, { connectionStateRecovery: {} }); const __dirname = dirname(fileURLToPath(import .meta.url));app.get('/' , (req, res) => { res.sendFile(join(__dirname, 'index.html' )); }); io.on('connection' , (socket) => { socket.on('chat message' , async (msg) => { let result; try { result = await db.run('INSERT INTO messages (content) VALUES (?)' , msg); } catch (e) { return ; } io.emit('chat message' , msg, result.lastID); }); }); server.listen(3000 , () => { console .log('server running at http://localhost:3000' ); });
然后客户端将跟踪偏移量:
title 1 2 3 4 5 6 7 8 9 10 11 12 13 14 15 16 17 18 19 20 21 22 23 24 25 26 27 <script > const socket = io({ auth: { serverOffset: 0 } }); const form = document .getElementById('form' ); const input = document .getElementById('input' ); const messages = document .getElementById('messages' ); form.addEventListener('submit' , (e) => { e.preventDefault(); if (input.value) { socket.emit('chat message' , input.value); input.value = '' ; } }); socket.on('chat message' , (msg, serverOffset) => { const item = document .createElement('li' ); item.textContent = msg; messages.appendChild(item); window .scrollTo(0 , document .body.scrollHeight); socket.auth.serverOffset = serverOffset; }); </script >
最后,服务器将在(重新)连接时发送丢失的消息:
title 1 2 3 4 5 6 7 8 9 10 11 12 13 14 15 16 17 18 19 20 21 22 23 24 25 26 27 28 29 30 io.on('connection' , async (socket) => { socket.on('chat message' , async (msg) => { let result; try { result = await db.run('INSERT INTO messages (content) VALUES (?)' , msg); } catch (e) { return ; } io.emit('chat message' , msg, result.lastID); }); if (!socket.recovered) { try { await db.each('SELECT id, content FROM messages WHERE id > ?' , [socket.handshake.auth.serverOffset || 0 ], (_err, row) => { socket.emit('chat message' , row.content, row.id); } ) } catch (e) { } } });
让我们看看它是如何工作的:
正如您在上面的视频中看到的那样,它在临时断开连接和完全刷新页面后都可以正常工作。
与 “连接状态恢复” 功能的不同之处在于,成功恢复可能不需要访问您的主数据库(例如,它可以从 Redis 流中获取消息)。
好了,现在让我们谈谈客户端消息传递。
客户端消息传递 让我们看看如何确保服务器始终接收客户端发送的消息。
默认情况下,Socket.IO 提供“至多一次”交付保证(也称为“发送并忘记”),这意味着在消息未到达服务器时不会重试。
缓冲事件 当客户端断开连接时,对 socket.emit() 的任何调用都将被缓冲直到重新连接:
在上面的视频中,”realtime” 消息被缓冲,直到连接重新建立。
这种行为可能完全足够满足您的应用程序需求。然而,在一些情况下,消息可能会丢失:
在发送事件时连接被切断
服务器在处理事件时崩溃或重新启动
数据库暂时不可用
至少一次 我们可以实现“至少一次”保证:
1
2
3
4
5
6
7
8
9
10
function emit (socket, event, arg ) socket.timeout(5000 ).emit(event, arg, (err) => { if (err) { emit(socket, event, arg); } }); } emit(socket, 'hello' , 'world' );
1
2
3
4
5
6
const socket = io({ ackTimeout: 10000 , retries: 3 }); socket.emit('hello' , 'world' );
在这两种情况下,客户端将重试发送消息直到从服务器获得确认:
1 2 3 4 5 6 io.on('connection' , (socket) => { socket.on('hello' , (value, callback) => { callback(); }); })
使用 retries 选项, 消息的顺序是有保证的,因为消息是排队并逐个发送的。这在第一种选项中不适用。
确切一次 重试的问题在于服务器可能会多次收到相同的消息,因此它需要一种方法来唯一地标识每条消息,并且只在数据库中存储一次。
让我们看看如何在我们的聊天应用程序中实现“确切一次”保证。
首先,在客户端给每条消息分配一个唯一标识符:
title 1 2 3 4 5 6 7 8 9 10 11 12 13 14 15 16 17 18 19 20 21 22 23 24 25 26 27 28 29 30 31 32 33 34 <script > let counter = 0 ; const socket = io({ auth: { serverOffset: 0 }, ackTimeout: 10000, retries: 3, }); const form = document .getElementById('form' ); const input = document .getElementById('input' ); const messages = document .getElementById('messages' ); form.addEventListener('submit' , (e) => { e.preventDefault(); if (input.value) { const clientOffset = `${socket.id} -${counter++} ` ; socket.emit('chat message' , input.value, clientOffset); input.value = '' ; } }); socket.on('chat message' , (msg, serverOffset) => { const item = document .createElement('li' ); item.textContent = msg; messages.appendChild(item); window .scrollTo(0 , document .body.scrollHeight); socket.auth.serverOffset = serverOffset; }); </script >
socket.id 属性是一个随机的 20 字符标识符,分配给每个连接
我们也可以使用 getRandomValues()
然后在服务器端将此偏移量与消息一起存储:
title 1 2 3 4 5 6 7 8 9 10 11 12 13 14 15 16 17 18 19 20 21 22 23 24 25 26 27 28 29 30 31 32 33 34 35 36 io.on('connection' , async (socket) => { socket.on('chat message' , async (msg, clientOffset, callback) => { let result; try { result = await db.run('INSERT INTO messages (content, client_offset) VALUES (?, ?)' , msg, clientOffset); } catch (e) { if (e.errno === 19 ) { callback(); } else { } return ; } io.emit('chat message' , msg, result.lastID); callback(); }); if (!socket.recovered) { try { await db.each('SELECT id, content FROM messages WHERE id > ?' , [socket.handshake.auth.serverOffset || 0 ], (_err, row) => { socket.emit('chat message' , row.content, row.id); } ) } catch (e) { } } });
这样, client_offset 列上的 UNIQUE 约束防止了消息的重复.
不要忘记确认事件,否则客户端将继续重试 (最多重试 retries 次).
1 2 3 4 socket.on('chat message' , async (msg, clientOffset, callback) => { callback(); });
再次强调,默认保证(“至多一次”)可能对您的应用程序已经足够了,但现在您知道如何使其更加可靠。
在下一步中,我们将看到如何横向扩展我们的应用程序。
您可以直接在以下链接中在浏览器中运行此示例:
横向扩展 现在我们的应用程序已经可以在临时网络中断的情况下保持稳定,让我们看看如何在水平方向上扩展它,以便能够支持数千个并发客户端。
横向扩展(也称为“横向扩展”)意味着向您的基础架构中添加新服务器以应对新需求
纵向扩展(也称为“纵向扩展”)意味着向现有基础架构添加更多资源(处理能力、内存、存储等)
第一步:让我们利用主机的所有可用核心。默认情况下,Node.js 在单个线程中运行您的 JavaScript 代码,这意味着即使拥有 32 核 CPU,也只会使用一个核心。幸运的是,Node.js 的 cluster module
我们还需要一种方法在 Socket.IO 服务器之间转发事件。我们称这种组件为“适配器”。
所以让我们安装集群适配器:
1 npm install @socket.io/cluster-adapter
现在我们将其插入:
title 1 2 3 4 5 6 7 8 9 10 11 12 13 14 15 16 17 18 19 20 21 22 23 24 25 26 27 28 29 30 31 32 33 34 35 36 37 38 import express from 'express' ;import { createServer } from 'node:http' ;import { Server } from 'socket.io' ;import sqlite3 from 'sqlite3' ;import { open } from 'sqlite' ;import { availableParallelism } from 'node:os' ;import cluster from 'node:cluster' ;import { createAdapter, setupPrimary } from '@socket.io/cluster-adapter' ;if (cluster.isPrimary) { const numCPUs = availableParallelism(); for (let i = 0 ; i < numCPUs; i++) { cluster.fork({ PORT: 3000 + i }); } setupPrimary(); } else { const app = express(); const server = createServer(app); const io = new Server(server, { connectionStateRecovery: {}, adapter: createAdapter() }); const port = process.env.PORT; server.listen(port, () => { console .log(`server running at http://localhost:${port} ` ); }); }
就是这样!这将为您的机器每个可用的 CPU 生成一个工作线程。让我们看看它是如何运行的:
正如您在地址栏中所见,每个浏览器选项卡都连接到不同的 Socket.IO 服务器,适配器只是在它们之间转发 chat message 事件.
当前有 5 个官方适配器实现:
因此,您可以选择最适合您需求的适配器。但请注意,某些实现不支持连接状态恢复功能,您可以在 这里 找到兼容性矩阵.
在大多数情况下,您还需要确保 Socket.IO 会话的所有 HTTP 请求到达同一个服务器(也称为“粘性会话”)。但这里不需要,因为每个 Socket.IO 服务器都有自己的端口。
更多信息请参阅 这里 .
这最终完成了我们的聊天应用程序!在本教程中,我们看到了如何:
在客户端和服务器之间发送事件
广播事件到所有或一部分连接的客户端
处理临时断开连接
扩展
现在您应该对 Socket.IO 提供的功能有了更好的了解。现在是您构建自己的实时应用程序的时候了!
您可以直接在浏览器中运行此示例:
结束语 最终的服务器端代码 title 1 2 3 4 5 6 7 8 9 10 11 12 13 14 15 16 17 18 19 20 21 22 23 24 25 26 27 28 29 30 31 32 33 34 35 36 37 38 39 40 41 42 43 44 45 46 47 48 49 50 51 52 53 54 55 56 57 58 59 60 61 62 63 64 65 66 67 68 69 70 71 72 73 74 75 76 77 78 79 80 81 82 83 84 import express from 'express' ;import { createServer } from 'node:http' ;import { fileURLToPath } from 'node:url' ;import { dirname, join } from 'node:path' ;import { Server } from 'socket.io' ;import sqlite3 from 'sqlite3' ;import { open } from 'sqlite' ;import { availableParallelism } from 'node:os' ;import cluster from 'node:cluster' ;import { createAdapter, setupPrimary } from '@socket.io/cluster-adapter' ;if (cluster.isPrimary) { const numCPUs = availableParallelism(); for (let i = 0 ; i < numCPUs; i++) { cluster.fork({ PORT: 3000 + i }); } setupPrimary(); } else { const db = await open({ filename: 'chat.db' , driver: sqlite3.Database }); await db.exec(` CREATE TABLE IF NOT EXISTS messages ( id INTEGER PRIMARY KEY AUTOINCREMENT, client_offset TEXT UNIQUE, content TEXT ); ` ); const app = express(); const server = createServer(app); const io = new Server(server, { connectionStateRecovery: {}, adapter: createAdapter() }); const __dirname = dirname(fileURLToPath(import .meta.url)); app.get('/' , (req, res) => { res.sendFile(join(__dirname, 'index.html' )); }); io.on('connection' , async (socket) => { socket.on('chat message' , async (msg, clientOffset, callback) => { let result; try { result = await db.run('INSERT INTO messages (content, client_offset) VALUES (?, ?)' , msg, clientOffset); } catch (e) { if (e.errno === 19 ) { callback(); } else { } return ; } io.emit('chat message' , msg, result.lastID); callback(); }); if (!socket.recovered) { try { await db.each('SELECT id, content FROM messages WHERE id > ?' , [socket.handshake.auth.serverOffset || 0 ], (_err, row) => { socket.emit('chat message' , row.content, row.id); } ) } catch (e) { } } }); const port = process.env.PORT; server.listen(port, () => { console .log(`server running at http://localhost:${port} ` ); }); }
最终的客户端代码 title 1 2 3 4 5 6 7 8 9 10 11 12 13 14 15 16 17 18 19 20 21 22 23 24 25 26 27 28 29 30 31 32 33 34 35 36 37 38 39 40 41 42 43 44 45 46 47 48 49 50 51 52 53 54 55 56 57 58 <!DOCTYPE html > <html > <head > <meta name ="viewport" content ="width=device-width,initial-scale=1.0" > <title > Socket.IO chat</title > <style > body { margin : 0 ; padding-bottom : 3rem ; font-family : -apple-system, BlinkMacSystemFont, "Segoe UI" , Roboto, Helvetica, Arial, sans-serif; } #form { background : rgba (0 , 0 , 0 , 0.15 ); padding : 0.25rem ; position : fixed; bottom : 0 ; left : 0 ; right : 0 ; display : flex; height : 3rem ; box-sizing : border-box; backdrop-filter : blur (10px ); } #input { border : none; padding : 0 1rem ; flex-grow : 1 ; border-radius : 2rem ; margin : 0.25rem ; } #input :focus { outline : none; } #form > button { background : #333 ; border : none; padding : 0 1rem ; margin : 0.25rem ; border-radius : 3px ; outline : none; color : #fff ; } #messages { list-style-type : none; margin : 0 ; padding : 0 ; } #messages > li { padding : 0.5rem 1rem ; } #messages > li :nth-child(odd) { background : #efefef ; } </style > </head > <body > <ul id ="messages" > </ul > <form id ="form" action ="" > <input id ="input" autocomplete ="off" /> <button > Send</button > </form > <script src ="/socket.io/socket.io.js" > </script > <script > let counter = 0 ; const socket = io({ ackTimeout: 10000, retries: 3, auth: { serverOffset: 0 } }); const form = document .getElementById('form' ); const input = document .getElementById('input' ); const messages = document .getElementById('messages' ); form.addEventListener('submit' , (e) => { e.preventDefault(); if (input.value) { const clientOffset = `${socket.id} -${counter++} ` ; socket.emit('chat message' , input.value, clientOffset); input.value = '' ; } }); socket.on('chat message' , (msg, serverOffset) => { const item = document .createElement('li' ); item.textContent = msg; messages.appendChild(item); window .scrollTo(0 , document .body.scrollHeight); socket.auth.serverOffset = serverOffset; }); </script > </body > </html >
作业 以下是改进该应用程序的一些想法:
当有人连接或断开连接时,向所有在线用户广播消息。
添加对昵称的支持。
不要将相同的消息发送给发送它的用户。而是在用户按下回车键后立即将消息直接追加。
添加“{用户}正在输入”的功能。
显示在线用户。
添加私聊功能。
分享您的改进!
获取此示例 您可以在 GitHub 上找到它 这里 .
1 git clone https://github.com/socketio/chat-example.git